


Do you want to explore your brand on Facebook Show Pages?
Don’t you know what it mean?
How facebook Show Pages are vary from Facebook Pages?
About Show
A show is the collection of thematic videos. Those are released in the form of episodes which let the audiences to watch the half of the video content theme. The continuing and relevant episodes are served to the audiences when they continue to follow the Shows.
Facebook Show Pages
Facebook has introduced the new feature named Facebook Show Pages where the creation of flawless Facebook Show and publishing of episodes will take place.
The concept of Facebook Show will let the audiences to know about all shows, relevant videos and allows to join with the established communities on the Show.
Benefits of Facebook Show Pages
- The trailer can be found in the cover spot, splitting episodes into seasons, brand exposure through show mark and watch episodes.
- The reach of the trusty and expected audiences is the benefit that is available through Facebook Show Pages.
- Through this activity, the audiences can follow the liked shows.
- The followers will be notified of the arrival of Shows’s new episode.
- The launch of new episodes will arrive on the Watchlist of Watch tab.
- The creators can make use of Ad Breaks to monetize the Facebook Shows.
- They can also make use of the branded content tag in the creation of the Sponsored Shows.
Requirements To Upload a Video to Facebook Show Pages
- Facebook supports all types of Video File formats. But to upload video episodes recommend MP4 File Format.
- Facebook Show pages support longer videos. But the video should be less than 45 minutes. The more extended video takes large file size and it show effect on quality of the video.
- The preferred audio for Facebook shows Pages was Stereo AAC audio compression with 128kbps.
- To optimize the quality of a video, we recommend HD videos with 1080p resolution less than that.
- It supports maximum file size of 1.75 GB, if you consider longer videos it may take few minutes to upload.
- If your videos are more prolonged than 1.75GB, please contact the Partner Manager inform that your page Whitelisted for large files sizes.
Best Practices For Increasing the Engagement
Manage Your video for 3 sec autoplay to receive the series of Episodes as soon as possible.
Avoid these features like Promotional content, storytelling, title cards slow down your video at the beginning. Avoid these for some time to grab the viewer’s attention to enhance the faster audience engagement.
Add Audience Restriction
In some cases, it may restrict some people while viewing the Video. To avoid this, you can take control over your video who can see your posts by location wise such as country, state, zip code and city.
You can have access on age restrictions, gender, and language restrictions. Use this feature to control the restriction by specific demography.

How To Work On It:
- Follow the instructions to upload a video on this page.
- Choose the “Globe” icon which located at right side of “Publish” option.
- Click on “Globe “ icon and “Limit the Visibility of the Post.”
- Put a limit on choosing the options like Locations, Gender, Age, and Language.
- Click on “ Save Post Settings” and check your post if it’s working or not.
Uploading the Videos
When you are trying to upload a video on Facebook, you can see the “Basic” options to edit the video.
Video Category:
This option to know the interests of your video and information used to suggest or related videos on News Feed.
Video title:
Video title helps the viewers to understand what type of video will be watching.
Post Update:
It is an indication to the viewers what your videos will showcase.
Video Thumbnails:
In some countries, the autoplay option is not available, so this image appears as your video preview.
Call To Action:
It appears at the end of your video. Call to action invites the viewers to your Websites or destination Blogs.

How To Work On It:
- Click on the Photo/Video at the top of your News Feed on the Facebook page.
- Click on it to upload a photo/video on your page.
- Choose the Video/Phone from your device to upload.
- It is optional to give Video Title, Video Category, Call to action, Post update. These are all optional updates.
- If you would like to invite Viewers to your website, fill the call to action field with the desired link.
- If you finish everything and click on “Publish.”
Enabling Captions For Your Video
Captions help users to watch videos if they are in any environment. It makes sense when you watch the video with the sound off, and it also helps deaf and dumb people who can’t hear and express their feelings.
Captions give best audience engagement with the video in many situations. To enable Closed Captions Facebook show pages varies on devices.
If you are using a computer, you can click on “CC” at the bottom right side of the video to enable Captions.
If you are using mobiles, the caption will display automatically when the user muted the sound on the video.

How to Work On It:
- Follow the Video uploading instruction to upload a video.
- Click on “Captions” just beside the Basic options.
- Click on “Upload SRT File” and choose SubRip(.srt) file from your computer.
- Click on “Upload SRT File “ again to add Closed captions in other languages.
- If the user selected language captions are not available, Backup Language will help to backup the other languages.
Managing the Distribution Options
If you would like to keep restrictions where your video distributed . To operate with distribution options on Facebook just follow the below settings. You have given several distribution options to for your video
1.Exclude From the News Feed:
If you choose this option, your video published on the video tab on your page. It gives you control over the back catalog of the content rather than sending all your footage on news feed at once. You have option chance to choose to publish your videos at a later date on Newsfeed.
2. Prohibiting Embedding:
It helps you to set restrictions to stop embedding and posting on third parties.
3. As a Secret Video:
Secret videos give page owner to only publish through direct URL, but not searchable to other people on the Facebook. This option is used to host your video on Facebook. The page owners can only share the URL to post anywhere. But other people can not have access to post on Facebook.

How to Work On It:
- Click on the “Advanced” option beside the Captions.
- Select the “Custom” option from the Dropdown menu just below the Distribution Summary.
- Choose any one of the below three options to customize your distribution.
- 1).Exclude From News feed 2).Prohibiting Embedding 3). As a Secret Video
- The Distribution summary options provide the guideline for where would like to appear your video on Facebook.
Schedule a Video To Publish Later
You can create your video and set it to publish on Facebook at a later date.
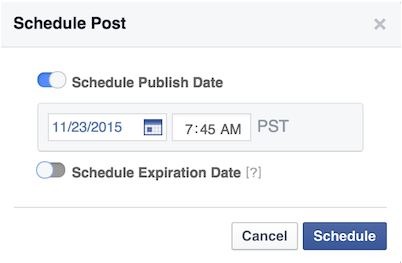
How To Work On It:
- Follow the Instruction to upload the video to Facebook Show Pages.
- Click on the Downward arrow next to the Publish option.
- Select Schedule option and schedule it as per your requirements.
Setting An Expiration Date For Video
You can set an expiration date for your video, in case if your video date expires the video will be no longer available on the facebook page. If you share your video somewhere else, that video also not visible.

How To Work On It:
- To see a video after it expires, Go To “Publishing Tools “ located on top of the page.
- Else, Go To “Setting” on top of your page and Click on “Expiring Posts.”
- Click and check the box which is next to “ Allow people who manage this page to select a time when posts unpublish.”
- Click on “Save Change.”

To Schedule, an Expiration date For a Video on Facebook Page, Follow the below Guidelines.
- Follow all instructions to upload a video to your facebook page.
- Click on the Arrow Next to “Publish” and schedule your post.
- Choose and Turn on “Set Expiration Date.”
- Choose the date and time and schedule the Expiration date just like how you schedule the post for later publishing.
- You would like to delete the post when it expired.
- Check the box “Delete the Post. Permanently remove the post and its insights at the scheduled time”.
- Click on the “Publish” to publish your post.
Management of video library
Here we can organize and alter the videos. What we exactly do in the Video Library.
Video Metadata Editing:
The proper video editing can be done here that means the changing the thumbnail, adding the captions of other languages, etc.
Finding specific video through search and filter:
Particular video can be found by using the titles and description etc.
Distribution options management:
Disallowing the embedding the videos by third parties and the video publishing in the Newsfeed are enabled through this option.
Secret video viewing and management:
The page secret videos can be accessed.

How To Work On It:
- Click on Publishing Tools appears on the top of the page.
- Then under the Videos choose the Video Library.
- Select the pencil symbol in the video’s description to do editing.
- The video title and description keywords can be typed and searched in the search bar to find the video through search and filter.
- Choose the videos you want to manage through distribution option. Select the Action and make changes to distribution by choosing it.
Conclusion
Facebook Show Pages are similar to Facebook pages but slightly vary that Shows have the advanced features that are beneficial to both the creators and audiences simultaneously.